“People seldom notice old clothes if you wear a big smile”…Lee Mildon
The beauty of creative expression is that everyone can wear it. I use the word ‘wear’ because one of the more visually assertive ways to show your creative expression, is through your wardrobe; your personal display of fashion. An exciting way for you to capture that expression is by doing it yourself. Now, I’m not talking about having to go as far back with your skills as constructing your garments from scratch, I’m simply talking about making a ’mends’ with some of the pieces you already own. I’m quite confident if you look through your closet and rummage through drawers, you will find some excellent starting points for yourself. Before you set out on your clothing exploration, take a moment to peruse a couple of quick and easy ideas to help open your eyes wide, and tune your creative radar into the stylish possibilities that lie before you.
Mix-Ups
Ever thought the sleeves off one shirt would look much better on the body of another? If so, take action on that idea and try it on for size. When removing the sleeves you are going to be transferring to another shirt, keep the stitching and structure of the sleeve intact, along with enough material to the outside to give yourself a seam allowance, and something to grab onto when pinning into place and stitching. When removing sleeves to utilize the body of the shirt, be careful not to disturb the stitching and structure of the shoulder and deconstruct with placement of the new sleeve in mind. Pin new sleeve onto new body, and stitch in place. Puffy, chiffon-type sleeves are unexpected additions to sweater vests!

Tie-Downs
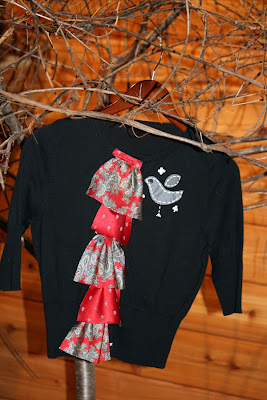
A few manly accessories can offer up the perfect amount of newfound frills, for an old cardigan or sweater vest. The material to use for your ruffles is found in men’s neckties. Carefully deconstruct the tie(s) to remove the lining and iron open the usable exterior material. Cut panels that are 5 inches long by desired width. Edges are left raw. Use a running stitch to lightly gather the top and create a ‘ruffle’. Tack into place with a hand stitch allowing each ruffle to over lap the other by about one inch. Try it on, check placement and make any revisions, if needed. Finish off the top of your ruffle with a ¾” cut strip of similar tie material. Hand or machine stitch into place. This strip covers up the gathered portion and finishes off the individual ruffles beautifully.

Experiment with different color/pattern combinations by using a few different ties. Play around with the placement of your ruffles. You can change up the finished look by layering the ruffles, largest to smallest or vise versa.
There are plenty more that I will share later, but this should get you started....
Cheers to working with what you have and wearing it proudly!
michele.
Tuesday, September 29, 2009
rE-FaShiOnED
Subscribe to:
Post Comments (Atom)


No comments:
Post a Comment