

Congrats to all who participated in the 4-H Stitch This! competition this past weekend at the fair! What a fun display of resourcefulness, teamwork and creativity. I was asked to help judge this new competition at the fair and I can honestly say I enjoyed every minute of it. There were 13 teams and all of them were assigned the challenge of repurposing a wedding gown into another style of garment(s). 


None of them knew what type of wedding dress they were going to have to work with until the competition started, so as you can expect, some of the teams' preconceived plans were immediately revised. It was very interesting to watch how each team approached their designs and executed their ideas. Some came into it with lengthy research and trial runs on their intended designs while others just figured it out as they went. 
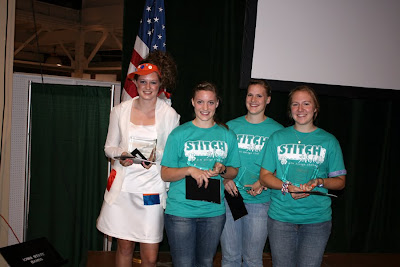

As much fun as it was to be a part of, it's always hard to 'judge' and select a winner. I wish there could have been a prize for them all. The Team that won (Pretty In Park - in photo below) will appear on one of our upcoming B. Organic episodes that is all about weddings. They'll get a chance to share their design and experiences in a segment that celebrates repurposing ideas for all that 'one and done' wedding attire! 
Every one of them did a beautiful job of representing themselves and their skills, and they should be most proud! I do hope all of the garments that were made will get a little 'wear' at some point in the year! 
Cheers to 4-H, and all the opportunities they provide for young people!
michele.
Wednesday, August 26, 2009
sTiTCh ThiS! @ ThE IoWa StAtE fAIr
Thursday, August 20, 2009
kIDS oN ThE JoB!

School is back ON! I can re-claim those daytime hours with a bit more 'focus' now! Keeping family, work and play in a well tuned harmonic balance isn't easy. Heck, most days it isn't even possible, but we try our best, don't we?! For those of you who work at home or have your own business, you'll appreciate the efforts we make to keep our kids productively entertained while we work. 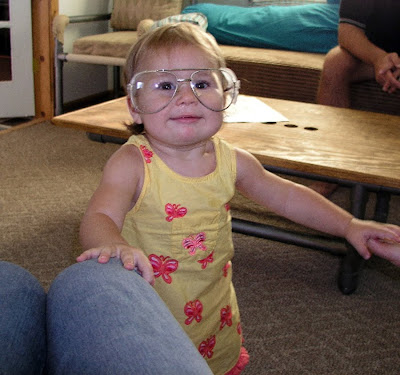
Madeline has been hanging with me in the shop since birth, and as she's gotten older, I've continued to make sure she has her own 'space' to work/play alongside me.
I have to run between two different studios now, so I've had to rig up a couple different setups for her. At the 408 studio, she has her own 'office', and at our home studio, she has her 'workbench' area. 

Some days are more productive than others, but if there's one thing that's been consistent over the years, it's that she's a "MESSER"!
She gets EVERYTHING out, EVERYTIME, she mixes, stirs, glues, develops imaginative concoctions of this or that and of course has a hard time confining it to her own designated areas. (sawdust sweets are her specialty) She leaves her mark in a number of ways in a number of places, and thankfully, it blends right in with the type of work we do. 
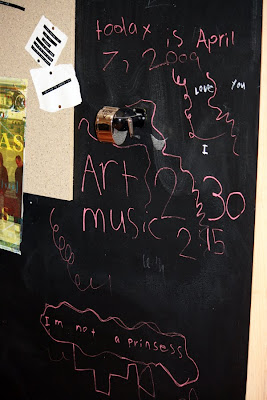


It's these little touches that I see throughout the day that keep things interesting, keep things carefree, and ultimately remind me that work should always be fun, and filled with a little adventure each day. Our work should always be the best we can make it no matter what the circumstances, and we too should be working to leave our own positive mark on someone, or something, in some way. The best part is, even with the most unexpected combinations, and the least favorable conditions, something can still grow, something great can still be created out of basically nothing. 
(no idea what all she mixed in with that sawdust, but in a pitch dark back room, on a bone dry paper plate; there's growth...not sure what role the clamps are playing, but...nice touch!)
And to think, I thought she was learning all kinds of stuff from me this whole time....when actually, I've learned quite a few things from her over the years.
Cheers to letting your kids in on the job from time to time. Work is a good thing...let's show them that.
michele.
Monday, August 17, 2009
iT's aLL iN thE CaKE!
Happy Monday Creators, Zach here to share a creative project I had some fun with over the weekend. Besides the fact that Michele is already writing 6 other blogs this week, and that I love taking over her blog, I actually had some creative fun myself last weekend. I will give you this much, it wasn’t my idea to take on this project, but my girlfriend insisted so away we went. A certain friend of mine (who may or may not be the Creative Services Director for Simply Michele) is having a baby like ASAP.. And being the 'not so motivated friend' that I am, I might have waited a little too long, as in the baby is due Friday, to get a gift. Knowing that the baby shower had passed, and I was way behind the 8 ball, I decided I needed to do something a little different so I wasn’t just the crappy friend with the last minute present. In comes my girlfriend with the idea for a Diaper Cake. “A what?” I said. She proceeded to explain to me this clever little idea she found roaming the internet, where you roll diapers up into little... well, diaper rolls and then arrange them around a wooden dowel, or in our case, a wine bottle, to make a multi-layered cake. The supplies you will need are:
Diapers (I did 90, but if you want to get elaborate get as many as you can afford, you can make this thing as big as you want)
Assorted sized rubber bands
A wooden dowel or a wine bottle or anything circular you can wrap the diapers around
A big piece of cardboard
A roll of cellophane
Double-sided tape
Thin ribbon and also thick decorative ribbon,
Little goodies for the baby, the new mom, or the new dad (baby lotion, bottles, diaper rash cream, etc.)
(Sorry some of the pictures are a little blurry, I did the best I could with my iPhone. Ha.)
To start you roll a lot of diapers and keep them tight with small rubber bands. We set a wine bottle on a big book (we later transferred it to a piece of cardboard for the wrapping process, so if you have the cardboard in the first place, I’d recommend using it instead of trying to transfer later) and then we began arranging the diapers in a circle around the bottle. Once we had one full row of diapers around the bottle, we used a larger rubber band to hold them all in place. Then, we took off each individual rubber band from the diapers, this way they are all held in place by the one big rubber band and whomever you give it to doesn’t have to spend hours taking off little rubber bands. You do this as many times as you like depending on how many rows you want on your bottom layer. We did four rows on the bottom layer, two rows on the middle layer and one around the top, and that’s just because I didn’t feel like going out at 8 o’clock on a Saturday night to get more diapers. Now that you have 4 rows, each row held in place by its own rubber band, you pull out random diapers from the first 3 rows and replace them with little presents (the key is to hide as many presents as you can on the inner layers, with only a few showing on the last row of diapers before the outer row, then its more of a surprise when they find the other ones inside. You don’t want any presents on the actual outside layer, only diapers, this just makes it look better, do you ever see an actual cake with the insides on the outside? Didn’t think so).
Presents in place? Alright, moving on. To start the second layer, you do the same as the first, except this time, you may have a few obstacles to work around due to the presents being different heights than the diapers, you just have to work the diapers around these and make sure they are hidden. Like I said, I did 4:2:1 on my cake layers from bottom to top, but the more layers or rows you do, the more room you have to hide stuff. Once you have your rows in place on the second layer, all rubber banded in place, hide more presents in the inside rows.
Depending on how many layers you decide to go with, or the height of whatever you are building the cake around, you just keep repeating the process until you get to the final layer. Our top layer was just one last row of diapers around the top of the wine bottle and BAM! You have yourself a diaper cake!
(if you notice we covered our rubber bands with thin blue ribbon, you don’t have to do this, we just had a transparent decorative ribbon, so we decided to do this to help hide the rubber bands)
Now all you have to do is spruce it up a bit, use the decorative ribbon to cover up your rubber bands on the outside of each layer and use the double-sided tape to hold it in place. Keep a few small presents (the little binky things, toys, anything that didn’t fit very well in the place of a diaper) and tie them onto the cake using the thin ribbon. Wrap the ribbon around one of the outer layer diapers and tie your present in place, just a little extra decoration for the outside.
Finally, lay out some cellophane, you can use the rolls or a bag if you can find one big enough. I used a roll, so I set my cake on a big piece of it I had rolled out to the appropriate length to fit around my cake and this all depends on the size of your cake. I’d say go bigger than you think you need, because you can always cut the excess off the top and its frustrating when you think you have enough and you don’t. Wrap it up, using the double-sided tape to keep the sides of the cellophane together and bunch the top and tie it with a ribbon. There, now you should have a diaper cake that looks like you went out and bought it at a store!
People seriously sell these things for like hundreds of dollars, so this is a fun and cheaper way to give a creative gift. There are so many different ways to do these things, search 'diaper cakes' on google and you are sure to find many more ideas than just the ones I've given you here. This is just how I did it, so nobody email me and tell me I did this step or that step wrong, creativity is all your own and it usually leads you away from the step by step and down an unbeaten path. Follow that creativity in all your projects including this one and have some fun!
Cheers to being young enough to say that this is my first gift to a friend who is having a baby! Oh how I love the age of 23!
ZTB Out!
Tuesday, August 11, 2009
baCk To BaSicS 'CreAtiVeLy'
“It is the supreme art of the teacher to awaken joy in creative expression and knowledge.”…Albert Einstein
Creative expression is fulfilling for people of every age. It’s liberating, nourishing, and it’s exciting to think there are so many different ways to go about it. Everything from the materials used and the act itself, to the discoveries made and the end results. The rewards and benefits are truly life enhancing. The need to express ourselves in a creative way is a basic one. It doesn’t require any special equipment and can be enjoyed and exercised in the simplest of ways. It doesn’t even mean you have to physically ‘create’ something. It can be expressed in how you put yourself together each day, or how you talk and play with your kids. Everything you need to express yourself creatively today is right there in front of you and I challenge you to really embrace it and engage yourself in the playfulness and spontaneity of it all. While the following ideas are meant to motivate you to use your hands and your imagination to physically create something, they will also make you appreciate a ‘working with what you have’ mentality in other areas of your life.
Nature is one of our greatest teachers and you will be amazed at all the natural goodness that lies outside your door just waiting to be used in your next creative venture. A simple branch can be turned into a number of different tools. You can keep it blunt and use it to stamp or manipulate your medium. You can sharpen the end to turn it into a drawing or marking tool. You can secure various materials to the end to create interesting brushes. Stones can be used as sanding or burnishing tools or to pound and crush. They are also wonderful stands for hot tools and brushes. Berries can be picked and mashed to create natural inks and colorants. Foliage can be dried and crushed and used as textural additives.
Combine nature with some of life’s leftovers that would otherwise be tossed in the trash and you broaden your options even further. Packaging can be sliced and diced into straight edges, stencils and palettes. You can use your cans and jars as mixing vessels or organizers. Waste papers can be shredded, blended and pressed into fine, handmade papers. Wine, coffee grounds and vegetables make beautiful stains and dyes. Random objects from around the house such as furniture, game boards, and leftover lumber can serve as unexpected canvases. 
Your kitchen cupboards may hold all the ingredients you need to cook up your own adhesives, clays, and colorants. Grab onto some of the tried and true recipes or experiment with a few of your own.
It doesn’t matter how or where you live, the wealth of creative possibilities is all around you at all times and they don’t have to cost you a dime. I challenge you to embark on your next creative adventure by working with what you have, making inventive use of the modest materials that lie before you.
Cheers to creative living, my friends!
michele.
Monday, August 3, 2009
dO iT YouRSelF MaGaZinE

I've been having some creative fun with our backyard buddies at Meredith and the Do It Yourself Magazine lately. They shared our repurposed PVC ideas in their latest issue and today we had a ball shooting another round of handmade, repurposed goodies for their October issue. The PVC projects take me WAY back to the day I saw all this various sized pipe laying around on Jon's shop floor. The first projects I ever played around with were pieces of furniture...chairs, coffee tables, bars, outdoor cabanas(definitely the largest and most memorable)..etc. It was like indestructible tinker toys and I was so excited at the thought of being able to furnish an entire apartment using this one material. I later got into slicing and dicing the leftover bits to create jewelry, wreaths, frames, and trellises. I must say, the outdoor trellis is probably one of my favorites and about 4-5 years later, it's still standing proud in my yard...looking as good as it did the day I installed it. You gotta love a DIY project that has such longevity in how it wears, and a style you never tire of. Yes, they sometimes turn out that way! 
Cheers to my friends at the Do It Yourself Magazine and their shared enthusiasm for a creative approach to doing things yourself! Pick up a copy today or check them out online.
michele.
