Sweet Salvage Style!
When in need of a unique stair railing.....Do It Yourself, as they say. It can be as easy as recycling tossed out steel fencing.
For quite some time now, I’ve been wanting to play around with taking fencing from the home improvement store and figuring out how to manipulate it into ballisters and railings for my stairway. Well, I still haven’t gotten the chance to make that happen, but I AM finally about to install some handmade stair railings created out of old steel fencing…railings that my clever dad has created. He likes to weld and has created things like trellises and sculptures for us all, so I thought this project would be right up his alley. I set him up with some pieces of old fencing that were getting tossed out and a drawing (which he never follows anyway, so I really don’t know why I bother with that step) and asked if he could turn it into a railing for us. He has half of it completed and not only does he not like to follow directions, he also doesn’t do the same thing twice, so each section is different. But as you can imagine, I totally appreciate that kind of stuff, so it is absolutely perfect and works beautifully in our space. The only thing I was adamant about with him was “PLEASE DO NOT PAINT IT!” (he sometimes likes to paint his welded creations, which I’m not real fond of because I think it takes away from the natural patina of the metal) Even as a new railing in my home, I wanted to let the rust and the uneven patina show through, the grind marks shine, and just seal it up as is. That’s the kind of stuff that I think gives a piece character – the things that just naturally happen and are very tough to re-create. We looked into having it powder coated with a clear finish, but we would have had to remove all the rust for it to adhere, so that option was out. I asked my friend, John Brommel (who is the most amazing metal artist) what I should use and he recommended this product by Sherwin Williams called Sher-Coat. This stuff is awesome! It’s more of an industrial type product designed to take a lot of wear and tear. We used an air sprayer to apply and it finished the railings off beautifully. It gave them a nice finish and didn’t cover up any of the natural beauty. We’re looking into other uses for this product on materials like wood and concrete to see if it could be the perfect sealant for some of our outdoor projects. I’ll definitely share whatever discoveries we uncover!
Enjoy the pics below set to some great tunes by Jerry Chapman with the title "I think you know" off his Put Me Together album. I hope it inspires you to embrace the creative talents of those around you and work together to make great things happen! We'll share the down and dirty, how-to side of things and what goes into converting a fence into a stair railing in an upcoming episode of MBCTC.
If I ever move….you know I’m taking that railing with me, right?!
Cheers!
michele.
Tuesday, May 20, 2008
feNcInG tuRnEd StaIR rAiLiNg
Tuesday, May 6, 2008
beLlY Up tO tHE MuD bAr


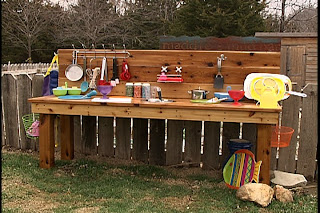
Summer hasn’t really even started yet, and I already feel like I’m running out of time. We’re finally getting some nice weather, so I’ve spent the past week cleaning off garden beds, disposing of all the worn, torn outdoor accessories that didn’t survive the winter and gearing up for some outdoor fun. I hosed off my daughter Madeline’s mud bar, gave it a fresh coat of sealer, and she’s already making a mess of things. Having a mud bar in the yard is definitely one of the popular attractions with all her friends, and I'd hate to think I'm the only one out there that encourages my kid to cook up a muddy mess in the yard, (a contained mess, for the most part!) so here’s to sharing an imaginative project just in time for the summer break!!
You'll be a hit with every kid on the block because every young tyke I know loves to play in the dirt and when you add water to the mix, the fun just escalates. Why not give them an outdoor play station that’s well stocked with all the proper tools to cook up a mean batch of mud pies, a killer leaf casserole and a steaming pot of grass soup!
To set up a mud bar in your yard or garden, there are a couple of different ways to go about it. For the basic bench structure, you can either convert an old potting bench or workbench by simply cutting down the legs and altering, or, if you’re a true do it yourself enthusiast, you can construct one from scratch. It’s a fairly simple project that can be completed in an afternoon. We constructed ours out of cedar using a simple workbench design with a back added on. You can adjust the size to whatever suits your space. You can see we've made full size as well as smaller scale ones. For detailed instructions sneak a peek here.
After you have it built or altered, the sky is the limit when it comes to how you go about setting it all up. Install hooks and baskets and stock the bar with the tools of the trade. Shop dollar stores for inexpensive items like kitchen utensils, cutting boards, etc. Setting it up and accessorizing is half the fun. Personalize it with some signage, place outdoors (where there’s easy access to a water supply) and let the muddy creations begin! Have a table set up nearby so they can play restaurant and set out a delightfully dirty feast for you and all their guests. It’s a great way to get kids to spend more time outdoors and celebrate nature in a fun, imaginative way. As I always say, creativity is messy and some of the biggest messes reveal the most amazing discoveries. And if anyone can tap into that, kids can!
Belly up to the mud bar and cheers to a dirty summer, my friends!
michele.


