


Good Grief....I'm a bit behind on things over on this side of the tracks......want to give everyone a reminder that we've got ALL our projects housed over at www.borganic.net and things are HEATING UP over there for the holidays, my friends!
The workshop has been one busy place, and we're even giving away a lot of the FINISHED projects we just did for the HGTV special and a whole lot more! Check in, throw your name in the hat, take what ideas you want and HAVE AT IT!
Here's our latest newsletter with all the latest.
CHEERS to CREATIVITY and HUGS TO YOU ALL!
michele.
Tuesday, November 23, 2010
Update! Update! Update!
Thursday, September 23, 2010
Back 2 Beige

My friend Dee will be most disappointed in me, as I reached for the beige paint can the other day. Yes, I turned our dining room/sitting area into a space with with big, beige, boring walls. Not because I'm not colorful or courageous in that area of course, but because I have too many other colorful things going on, on the walls and all around. Sometimes, you just have to go 'beige' to make it all work.
And as I painted this room, AGAIN.....I got to thinking of what makes painting a room actually fun and successful for me, personally. Most people think of painting a room as drudgery and I really think it's no big deal...just grab some paint and go.
- The paint.
- A good roller.
- Don't make it a bigger production than it needs to be....you're just putting color on walls.
- Versatile, easy to move ladder......
- Do a test spot.
Painting a room is really an easy task that anyone can do, and it's a quick way to freshen things up and make a change. .......
Just only go beige, if you HAVE to. :)
CHEERS to fresh paint.
michele.
Friday, August 27, 2010
shout out 4 an inspiring friend's blog
I had the pleasure of meeting C. McNair Wilson a couple years ago and I can honestly say he was memorable, charming and downright inspiring. He's a corporate creativity coach and speaker who gives one heck of an entertaining presentation! I like to check out what he's up to on his blog every so often and I'm sure you will too. He has some incredible stuff up there currently for all us doodle lovers! I got to peruse through one of his sketch/doodlebooks when I met him and it was FANTASTIC. They should be published.

Friday, August 13, 2010
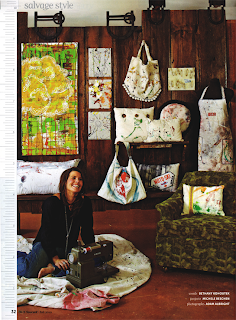
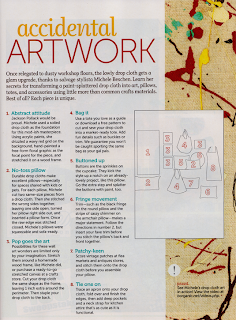
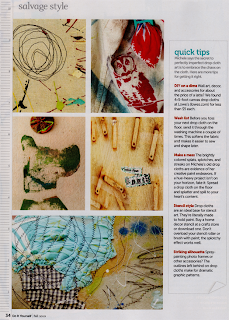
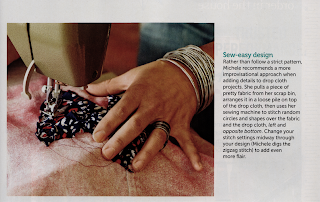
dropcloth decor and do it yourself magazine

It's a colorful material that gets created randomly while you work. It's an unexpected, unplanned BONUS. The designs, the color combinations, the textures.....all created without purpose, without direction.
 The dropcloths that lie beneath your work can be transformed into upholstery, throw pillows, paintings, purses and more.
 Launder them.
Press.
And use as you would any other material from the fabric store. Work with the designs as they are or play them up further by embellishing.
I've loved this project for years, and I'm excited to learn if others out there share an enthusiasm for these dropcloth beauties. I shared some idea starters in the latest issue of the Do It Yourself Magazine (summer 2010). (An inspiring read that is filled with creative projects front to back..pick one up today or better yet, start your subscription and get it delivered right to your house every quarter!)

michele.
Wednesday, August 4, 2010
for no reason at all.


Ever feel like sitting down and doing something for no reason at all? Something that has no direction or purpose? You just have an urge to go to your creative space and CREATE. Doing something mindless ironically enough is a great exercise in helping me become more mindful. To recharge.

One exercise I like to do every so often is to just sit down with:
- one canvas
- one tool (committing to only one brush or palette knife adds to the experience)
- a big pile of paint
and to just start moving it around.
All mixing happens on the canvas.
Rinsing or wiping your tool now and then is optional.
Just watching colors move, intertwine and blend is mesmerizing, inspiring and uplifting.
Witnessing the textures that erupt 'feels' GREAT.
Who knows what you'll come up with....and who cares.....it's the process that is the reward.
BUT I'm willing to bet,
you WILL end up with something that makes you smile..
you WILL end up with some sort of 'takeaway' that ends up in another project..be it a technique, color combination, etc.
and
you WILL want to do this mindless, yet mindful exercise more often.
I know I do.
Cheers!
michele.
Thursday, July 29, 2010
too many ideas scattered about in too many books


My question is this....how do you keep track of all your ideas so that you have quick reference to them? To rip out the pages and do some sort of filing system would somehow KILL the whole idea capturing process for some reason...not to mention the comfort and excitement that comes from watching the books pile up, knowing that there are zillions of ideas, thoughts, doodles and drawings captured between the sheets. On those 'blank' days, it's like having money in the bank! Creating some sort of scribbled index in the beginning of each book would be a bit of an extra job, but maybe that's the route I need to go......
Do you have a method to your creative madness that you'd be willing to share?! Would love to hear about it.
Cheers to blank books just waiting for us to grab hold and fill!
michele.
Wednesday, July 7, 2010
s.m.i. welcomes.....
Tarah Sissing to 408 Grant...she's a long way from home (Holland.....Michigan) and joining us for an adventurous internship this summer. Whoo! Hoo! Welcome to the team, my friend! (look at her....she's already taking a project and running with it...love that!)

Cheers to creative interns everywhere!
michele.
Monday, June 7, 2010
my new love for barbed wire
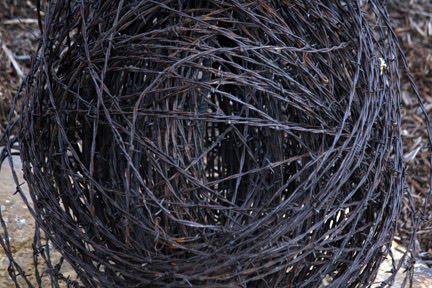

I have about 1 hour of time and Zero dollars invested in a couple of pretty sweet sculptures we just created for the front yard.
A friend of mine told me she had some barbed wire by her dumpster, thought maybe I could do something with it and when I went to check it out....it was love at first sight. I took one look and knew what I wanted to do.
The combination of rock and rusty metal is a nice contrast to the plants and they should easily stand the test of outdoor time. Once I got going I had all kinds of ideas for them, so I'll be keeping my eyes wide open! I quickly used up all the balls I had and am now hoping I stumble upon a few more down the road.


If someone offers you barbed wire...TAKE IT! Roll it up in a ball and get creative. We simply drilled some holes in the limestone rocks using a hammer drill (surprisingly very easy tool to use and drilling through limestone is a cinch) and used rebar to hold things in place.
SUPER, SUPER easy and FAST!
michele.
Wednesday, May 19, 2010
colorful, creative snack for the day

Serve up your art mediums in something new, my friends!
Old snack trays are a good choice. Their built in dividers and companion cups for rinse water or other additives make these vintage housewares a wonderful addition to the art studio that can get reused time and time again.


Worn out cookie sheets. Place a wet sponge at one end and your paints/mediums at the other. Work off the cookie sheet itself or line it with waxed paper. A convenient way to mix things, moisten your brushes and it too is a paint palette that can be used over and over again.

Divided storage containers with lids. These little plastic beauties are a better environment for my art supplies than my food, so I like to use them for mixing paints/mediums when I know I'm going to be working on something for an extended period of time. The airtight lids make it a cinch to store things for a few days without drying out.
 Cheers to creating...and, to taking time for a colorful snack now and then!
michele.
Thursday, April 29, 2010
mystery additions


Yes, I have a fascination with "character" decor, let's call it. Portraits, mannequins, heads.....creepy to some...... personable, quirky and fun to others like myself. I have them grouped together in various places and I've started to notice 'new additions' that I did NOT add. For instance, this little bust of JFK (I think that's who it's supposed to be) suddenly appeared on the mantel. 
Not sure how long he's been there, or who the character is that made the contribution. Have to admit...very funny....and even though he's not exactly something I would've necessarily picked to add to the collection, I'm considering letting him hang around just because it makes me laugh. I obviously need to keep a closer eye on my visitors not for fear of what they'll 'take', but rather what they're leaving behind. The things that make you go hmmmmmmmm?!
Anything showing up unannounced at your place?
Cheers to the unexpected.
michele.
Thursday, April 22, 2010
do it yourself magazine
rv.jpg)
Celebrate summer with our friends over at the Do It Yourself Magazine. They've put together another fun spread of ideas that are yours for the taking.
They shared our toolbench vanity project in this one and we just wrapped up another colorful shoot for their fall issue the first part of the week.
rv.jpg)
rv.jpg)
They 'work it up' over at that magazine compiling ideas from one end of the country to the other just for YOU...Pick one up, give it a read, get inspired and then take your own creative action, my friends!
Cheers to the excitement new reading material brings!
michele.
Thursday, April 15, 2010
...brought to you by the letter "C"

Courageous
Creative
Curious
Carefree
Colorful
Capable
Collaborative
Captivating
Confident
Chatty
Curvaceous
Calm, Cool & Collected
Considerate
Courteous
Centered
Candid yet congenial
Compassionate
Caring
Chivalrous
Conscientious
........just a few of my favorite 'c' words for all of us to 'b'.....
now on to what this is really about....
I've been wanting to play around with vertical plantings and arrangements for a while now, so we finally dug in and got one version started. If you 'make friends' with some of the sign shops in your area...you may discover that they have dumpsters out back filled with interesting treasures...that's where we scored these old letter shells that came down off of some large signage...They're made of metal and deep enough to plant in, and they needless to say make a very interesting container, especially for one we want to hang or rest against a wall.

We filled with potting mix, and then secured a layer of chicken wire cut to the shape and size of our planter. Next, we soaked some spaghnum moss and used that as our next layer, working it into the chicken wire. Finally....we carefully dug through....nipped and tucked at the chicken wire to open up here and there, and planted it up with some low growing plants like hens and chicks and a groundcover -the name is escaping me as I write this..but I think it's creeping thyme.. :)

End result....Love it! Everything is in there nice and snug...should fill in beautifully....it has a bit of weight to it, so not exactly sure if I'll hang it or lean it....and of course to water it, will need to let rest horizontally on occasion, but what's a little extra effort for something unique?! Suppose it would also look cute as a Centerpiece on a table, too...
Cheers to the letter 'c' and creative plantings!
michele.
Monday, April 12, 2010
the 'original' tabletop sawhorses
 I have my hubby Jon to thank for this idea.....he created these for the shop several years ago, we shared them on our program, B. Original.... and we find ourselves using them all the time. We've also given several of them as gifts. You'd be surprised how many times you'd like to hoist things up on the work bench to work on them and these are the perfect solution. They're easy to manage, portable and work beautifully. You can create a pair for yourself or if you'd like us to do the DIY'in for you...they'll be available in our store for purchase later this week.
For each horse, you’ll need one piece of 2x4 cut to a 16” length.
And (2) more 2x4’s that measure 8 inches.
 For the base of the horse, you’ll work with the 8” pieces.

One one side, you need to notch out for the legs. Measure over 2” from each side on the 8” board and then up ¾” and draw a line.
On the other side, you need to notch out for the cross-member..measure over from each end 3 1/4”…. ¾” inches up, and again draw a line.

Cut out using a handsaw, jigsaw or bandsaw.

In the shorter, cutout area drill a pilot hole using a 3/16” bit and secure the cross member to the base using a 3 ½” screw.


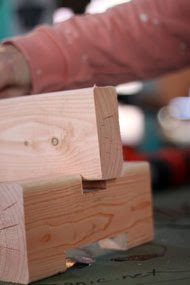
(You’ll have a one inch overhang on each end)….Do the same thing on the other end......and then repeat the entire process one more time for your second horse.
The original Tabletop Sawhorse….a handy must have for every studio or shop.

 Cheers to creating!
michele.
Tuesday, April 6, 2010
carefree creating

When is the last time you just 'played'? What do you have lying around? What could you make out of it? Even if you don't end up with anything....it's fun to just move things around, reconfigure, PLAY.....if you really look and immerse yourself in the process, I guarantee you'll end up 'seeing' something new.


Cheers to carefree creating and MORE of it.
michele.
Subscribe to:
Posts (Atom)