


Yes, I have a fascination with "character" decor, let's call it. Portraits, mannequins, heads.....creepy to some...... personable, quirky and fun to others like myself. I have them grouped together in various places and I've started to notice 'new additions' that I did NOT add. For instance, this little bust of JFK (I think that's who it's supposed to be) suddenly appeared on the mantel. 
Not sure how long he's been there, or who the character is that made the contribution. Have to admit...very funny....and even though he's not exactly something I would've necessarily picked to add to the collection, I'm considering letting him hang around just because it makes me laugh. I obviously need to keep a closer eye on my visitors not for fear of what they'll 'take', but rather what they're leaving behind. The things that make you go hmmmmmmmm?!
Thursday, April 29, 2010
mystery additions
Anything showing up unannounced at your place?
Cheers to the unexpected.
michele.
Thursday, April 22, 2010
do it yourself magazine
rv.jpg)
Celebrate summer with our friends over at the Do It Yourself Magazine. They've put together another fun spread of ideas that are yours for the taking.
They shared our toolbench vanity project in this one and we just wrapped up another colorful shoot for their fall issue the first part of the week.
rv.jpg)
rv.jpg)
They 'work it up' over at that magazine compiling ideas from one end of the country to the other just for YOU...Pick one up, give it a read, get inspired and then take your own creative action, my friends!
Cheers to the excitement new reading material brings!
michele.
Thursday, April 15, 2010
...brought to you by the letter "C"

Courageous
Creative
Curious
Carefree
Colorful
Capable
Collaborative
Captivating
Confident
Chatty
Curvaceous
Calm, Cool & Collected
Considerate
Courteous
Centered
Candid yet congenial
Compassionate
Caring
Chivalrous
Conscientious
........just a few of my favorite 'c' words for all of us to 'b'.....
now on to what this is really about....
I've been wanting to play around with vertical plantings and arrangements for a while now, so we finally dug in and got one version started. If you 'make friends' with some of the sign shops in your area...you may discover that they have dumpsters out back filled with interesting treasures...that's where we scored these old letter shells that came down off of some large signage...They're made of metal and deep enough to plant in, and they needless to say make a very interesting container, especially for one we want to hang or rest against a wall.

We filled with potting mix, and then secured a layer of chicken wire cut to the shape and size of our planter. Next, we soaked some spaghnum moss and used that as our next layer, working it into the chicken wire. Finally....we carefully dug through....nipped and tucked at the chicken wire to open up here and there, and planted it up with some low growing plants like hens and chicks and a groundcover -the name is escaping me as I write this..but I think it's creeping thyme.. :)

End result....Love it! Everything is in there nice and snug...should fill in beautifully....it has a bit of weight to it, so not exactly sure if I'll hang it or lean it....and of course to water it, will need to let rest horizontally on occasion, but what's a little extra effort for something unique?! Suppose it would also look cute as a Centerpiece on a table, too...
Cheers to the letter 'c' and creative plantings!
michele.
Monday, April 12, 2010
the 'original' tabletop sawhorses
 I have my hubby Jon to thank for this idea.....he created these for the shop several years ago, we shared them on our program, B. Original.... and we find ourselves using them all the time. We've also given several of them as gifts. You'd be surprised how many times you'd like to hoist things up on the work bench to work on them and these are the perfect solution. They're easy to manage, portable and work beautifully. You can create a pair for yourself or if you'd like us to do the DIY'in for you...they'll be available in our store for purchase later this week.
For each horse, you’ll need one piece of 2x4 cut to a 16” length.
And (2) more 2x4’s that measure 8 inches.
 For the base of the horse, you’ll work with the 8” pieces.

One one side, you need to notch out for the legs. Measure over 2” from each side on the 8” board and then up ¾” and draw a line.
On the other side, you need to notch out for the cross-member..measure over from each end 3 1/4”…. ¾” inches up, and again draw a line.

Cut out using a handsaw, jigsaw or bandsaw.

In the shorter, cutout area drill a pilot hole using a 3/16” bit and secure the cross member to the base using a 3 ½” screw.


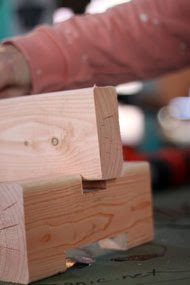
(You’ll have a one inch overhang on each end)….Do the same thing on the other end......and then repeat the entire process one more time for your second horse.
The original Tabletop Sawhorse….a handy must have for every studio or shop.

 Cheers to creating!
michele.
Tuesday, April 6, 2010
carefree creating

When is the last time you just 'played'? What do you have lying around? What could you make out of it? Even if you don't end up with anything....it's fun to just move things around, reconfigure, PLAY.....if you really look and immerse yourself in the process, I guarantee you'll end up 'seeing' something new.


Cheers to carefree creating and MORE of it.
michele.
Subscribe to:
Posts (Atom)