

WARNING -- You'll never discard another t-shirt ever again after this.
T-shirts are always a great place to start when it comes to repurposing the ole wardrobe. The material is easy to work with, it doesn't fray, and it's got that lived in feeling of comfort going for it. T-shirts also have a built in way of making a statement that can be creatively taken advantage of in a plethora of interesting ways.
One of my favorites as of late is the t-shirt pillow. The shirts can be mixed and matched to create a number of looks and sizes. You can use pillow forms, repurpose old pillows as your forms, or 'stuff to suit' with new or repurposed filling.
I top stitched everything 'wrong-sides' together, leaving seams and edges exposed on the exterior. They just looked better that way, every time. You can even do a no-sew version by cutting strips and tying it together. Have fun with the themes, the color combinations, and the style of pillow. To add to the novelty, use campaign style pins as your 'buttons'. FUN, FUN, FUN!!! 

Check out one of our 'quickie' videos that walk you through the simplicity of it all.
The scarf is another beauty that is easy to create and makes for a stylish gift idea. Friends have made them for me, I’ve made several for family and friends, and they'll never go out of style. There are so many unique looks and themes you can compile, they’re always original! A fun way to celebrate school activities, sporting events, concerts and more.
Our instructions are all about using the 12x12 panel because this allows for the commonly sized front and back panel graphics to remain in tact and makes for a fuller scarf. Don't be afraid to trim things down to suit your tastes. A 12x12 scarf version can be sliced right down the middle to create (his and her/best friend) skinny scarves.
It's an excellent way to repurpose your kids favorite tee's because they love to get in on the scarf wearing action, too! For kid sized scarves, cut your panels 7x9 (or, adjust to create your own one of a kind size, style and look!)
If you have a serger, serge your exposed edges for a more polished finish.
As an added touch, use your leftover bits to create a coordinating bag for your scarf. Fun to make, fun to wear!


Another 'quickie' on the t-shirt scarf shows you what you need to know, here.
.......along with a link to the latest issue of the Do It Yourself magazine that is also showing some love towards our hAnDMadE HotTeeS!
Cheers to the t-shirt and its' many creative uses!
michele.
Wednesday, September 30, 2009
hAnDMadE HotTeeS!
Tuesday, September 29, 2009
rE-FaShiOnED

“People seldom notice old clothes if you wear a big smile”…Lee Mildon
The beauty of creative expression is that everyone can wear it. I use the word ‘wear’ because one of the more visually assertive ways to show your creative expression, is through your wardrobe; your personal display of fashion. An exciting way for you to capture that expression is by doing it yourself. Now, I’m not talking about having to go as far back with your skills as constructing your garments from scratch, I’m simply talking about making a ’mends’ with some of the pieces you already own. I’m quite confident if you look through your closet and rummage through drawers, you will find some excellent starting points for yourself. Before you set out on your clothing exploration, take a moment to peruse a couple of quick and easy ideas to help open your eyes wide, and tune your creative radar into the stylish possibilities that lie before you.
Mix-Ups
Ever thought the sleeves off one shirt would look much better on the body of another? If so, take action on that idea and try it on for size. When removing the sleeves you are going to be transferring to another shirt, keep the stitching and structure of the sleeve intact, along with enough material to the outside to give yourself a seam allowance, and something to grab onto when pinning into place and stitching. When removing sleeves to utilize the body of the shirt, be careful not to disturb the stitching and structure of the shoulder and deconstruct with placement of the new sleeve in mind. Pin new sleeve onto new body, and stitch in place. Puffy, chiffon-type sleeves are unexpected additions to sweater vests!

Tie-Downs
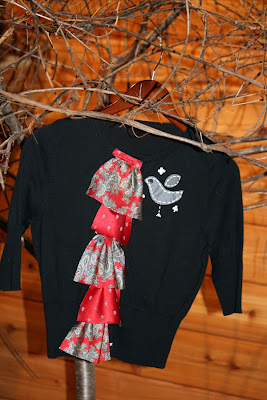
A few manly accessories can offer up the perfect amount of newfound frills, for an old cardigan or sweater vest. The material to use for your ruffles is found in men’s neckties. Carefully deconstruct the tie(s) to remove the lining and iron open the usable exterior material. Cut panels that are 5 inches long by desired width. Edges are left raw. Use a running stitch to lightly gather the top and create a ‘ruffle’. Tack into place with a hand stitch allowing each ruffle to over lap the other by about one inch. Try it on, check placement and make any revisions, if needed. Finish off the top of your ruffle with a ¾” cut strip of similar tie material. Hand or machine stitch into place. This strip covers up the gathered portion and finishes off the individual ruffles beautifully.

Experiment with different color/pattern combinations by using a few different ties. Play around with the placement of your ruffles. You can change up the finished look by layering the ruffles, largest to smallest or vise versa.
There are plenty more that I will share later, but this should get you started....
Cheers to working with what you have and wearing it proudly!
michele.
Friday, September 25, 2009
LEt HeR dRIP, PeOpLE


It's as simple, and as fun, as THAT. Really. Everyone gets so wrapped up in the perfect stroke, the just-so technique, well planned placement. Once in a while, let go of all that, relax, and try letting the paint just do what it does best. Because beauty also lies in the drips.
They're interesting.
They're acceptable.
They're addictive.
There's no such thing as a bad drip.
Let her drip...
...on your furniture
...on your clothing
...on your jewelry
...on your shoes
...on your belts
...on your bags
...on your walls
...on your paintings
...on your lamps
Play with the color combinations, the amount of paint, what you let it drip from, the consistency.......just. let her. drip.
and ENJOY!


Do it up today, my friends....you'll be glad you did.
michele.
Monday, September 21, 2009
thE CoURage tO CreAtE a NAturAllY goOD WedDiNg!


Huge congrats from all of us at SMI to Dave and Mariah on their new life together. They were married Sunday and we had a great time at their little soiree in the woods! I have to say they were the most relaxed pair, when it came to planning and organizing a wedding, that I have ever seen. They just kind of let things come together and enjoyed the process. It was refreshing to see a family put together a wedding that wasn't your 'typical' affair. They held their celebration under the trees at Hidden Acres....a camp that Dave and his family had spent several summers at. Friends made the most unique (and delicious) selection of cakes; their family and friends helped pull together the decor; Mariah had designed her own dress; and everything was absolutely perfect in a wonderful, simple, relaxing way. I even believe some of their family were camping out that night. There was a bon fire with s'mores; sparklers; vinyl being played; and several games of carpet ball and bocce ball. (Carpet ball was a new one to me, and I'm pretty sure we're going to be building one of those to put out in the yard this fall...it's loads of fun and I had a hard time pulling Madeline away from it.)


It's always fun to meet the people you work with's family and friends....Cheers to 'building' an incredible life together, Dave and Mariah!
Thursday, September 10, 2009
tHE NaTuRAL BeaUtY oF tHe ImAginATioN!
one of the many things currently sitting on my workbench:
a dancer?
what kind of treatment?
wax?
wire?
woodburn?
create a stand...and out of what?
or let hang?
create a head?
paint?
leave as is?
SO MANY POSSIBILITIES...LOVE IT!
What to do, what to do..........?!?!
wHAt Do yOu sEE? WhaT wOuLd YOu dO?
Cheers to driftwood and all the creative joy it brings! :)
For a little chatter on my latest driftwood hunt, visit here
michele.
Monday, September 7, 2009
ThE maGic Of a MisHaP

Let’s face it, when something breaks, our natural reaction is usually less than positive. We’re upset, we’re angry, we’re disappointed; we can dwell about the breakage for moments that extend long beyond the ‘break-up’. Or, we can choose to embrace the mishap and approach it as a creative opportunity. The opportunity to pick up the pieces and turn them into something magical. To take that break, tear, spill or split and work it into the piece or the design, to play it up, instead of down.
There are many common mishaps that all of us face at one time or another. One of them is broken glass. For me, this creative opportunistic approach towards breakage came about several years ago when I had a couple of windows neatly propped outside my studio to create some tabletops out of. The wind caught hold of them and after a couple of short blustery gusts; I had to come up with another idea. They had found their way to the concrete and the glass shattered into a starburst of shapes. As I was picking up what I initially thought to be a disaster, I started to arrange the pieces into different patterns. I started to see shapes and designs that I would never have been able to cut out of the glass intentionally. Each piece had a very natural, not contrived look to it. It’s what I like to call random acts of art. My imagination brought those shattered pieces back together again in a fun, starry-eyed way. I share it with you now, so you too can enjoy the magic of a mishap with these beautiful window ornaments.
SHATTERED STARS
You’ll need:
Broken Glass
Copper Foil Tape
Soldering Iron
Lead Free Solder
Liquid Flux
Jump Ring
Household Ammonia
Chain, rope, ribbon, or monofilament for hanging.

Select flat, broken glass pieces that aren’t too splintery or fragile. These can come from a broken window, picture frame or mirror.
To create the starburst window ornaments, select ones that are triangular in shape. (They will be irregular; so don’t focus on ‘perfect’ triangles.)
Each star will require 5 triangular shaped pieces.
Arrange them on your work surface in the shape of a star with the pointier sides facing out.
Tape off edges of each broken glass piece with copper foil tape (tape is available in different widths to accommodate different thicknesses of glass)
Brush liquid flux over the taped edges (available at any home improvement store – this helps prime the surface to accept the solder)
Use a soldering iron and lead free solder (also available in the plumbing section of any home improvement store) to tack together the pieces in the center. Finish off by covering all exposed foil tape with solder (front and back).
Fill the center with other various glass pieces like gems, large glass beads or stained glass. Wrap in foil tape and solder in place.
Solder a jump ring where desired to hang.
Clean off the flux with household ammonia, rinse with water and hang proudly!
Think of this project as a creative reminder to always pick up the pieces and carry on. You’ll find yourself looking forward to an unexpected ‘break’ now and then.
Cheers to the magic of a mishap, my friends!
michele.


